Maple Sugaring DIY
Sugaring is a great hobby and pretty much anyone with a maple tree can do it! It is a great way to connect to the past and produce something from the land. It is all natural, and totally safe and harmless for the trees. All it takes is a little patience and the reward is very sweet.
For a very small scale hobbyist keep reading below. For someone with more advanced interests be sure to check out some of our DIY posts where we show how we built a small batch evaporator and reverse osmosis (RO) system. These were built for approximately 25-50 taps.
Hobby Sugaring
Let's cover some basics first. Here is a list of things you will need:
Drill
A drill bit (match size to spile size)
Bucket and lid (or some other enclosed container)
A spile
Squeeze bottle (with hot water in it)
Hammer
2 Stainless steel pots or steam table pans
Stove or grill
Glass Mason jars
Coffee filters
Funnel
Candy thermometer
Tapping Season
Tapping season starts in late winter when the daytime temperatures warm to above freezing, while nightime temperatures stay below freezing. Here in Murrysville, PA that generally occurs in early February.
Tapping Process
Tree diameter should be 10-inches per tap or nearly 31.5-inches around at waist height.
Select a good spot on the tree about waist high and drill a hole that is 1.5 to 2-inches deep into the tree. The hole should very slightly slope downward at the exit.
Clear the hole of any wood chips or debris by using the squeeze bottle filled with hot water.
Gently tap the spile into the tree with a hammer until the sound changes and the spile is securely seated in the tap hole. Be careful not to hammer the spile into the tree too hard, risking damage to the tree.
Hang the enclosed bucket onto the spile and wait for the sap to run!
Gathering the Sap
It is best to gather the sap daily to prevent bacteria growth which can darken the color and effect the taste of the syrup.
Filter the sap using a coffee filter before boiling to remove any small sediment, debris, or insects.
A small amount of insects on or near the tap is common on warm sunny days. These are harmless to the tree and the syrup, which will be boiled for hours before being finished.
Be sure to check out our Maple Syrup Basics video series as well.
Reverse Osmosis (RO) Process
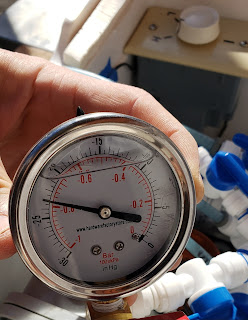
Reverse osmosis is a process in which pure water is removed from the sap through a membrane at high pressure (~100 psi) in order to increase the sugar content of the retained sap. This significant reduces boiling time and fuel consumption. Most RO systems will cut out 50% of the water, doubling the sap sugar content and cutting boiling time and fuel costs in half.
Boiling Process
It is best to boil the sap in small batches, pouring each batch into a second pan/pot once it has boiled down significantly (less than 1 inch in pot). Also, it is far more efficient to boil the sap in a large, flatter pan than a deep pot. This increases the surface area for evaporation and speeds up the process.
Repeat the process with subsequent batches, dumping the results into the second pan/pot, so the results of each batch are combined. Once all of your sap has been processed and combined you can begin boiling that pan/pot.
Repeat this overall batch-combine-batch process until you have reached the appropriate boiling temperature (and hence density) of maple syrup in the combined pan/pot. This approach will result in much lighter colored syrup with a better flavor.
It is a common mistake to continue to add fresh sap to the pan/pot as the level decreases from the boiling process. This over cooks the sap and sugar that was in the pan/pot from the beginning. This results in a much darker and almost burnt-flavored syrup due to the prolonged heating of the sugar molecules that were in the pan/pot from the start, and the potential for niter to form and for some of the sugar molecules to burn locally.
Another common mistake is to attempt to boil too much sap at once compared to the surface area for steaming. You have probably heard the saying "don't try to boil the ocean" and the same is true for sap. It takes approximately 8.3 BTU to heat 1 gallon of water 1°F. The more sap you start with in your pan, the more BTUs will be needed to bring it to a boil and sustain it. However, the surface area and volumetric evaporation rate remain constant for a given surface area. Therefore the most fuel efficient approach will limit the number of BTUs required, hence boiling thiner layers of sap (i.e.,smaller batches).
Temperature and Density
Syrup should be 66.9 Brix at 60°F. This equates to approximately 7.5°F above the boiling point of water (which fluctuates with barometric pressure and altitude).
"Light" syrup (under 66 Brix) is prone to bacteria growth over time if unrefrigerated. Meanwhile "heavy" syrup (above 67 Brix) is prone to forming sugar crystals on the bottom of the jar.
For the home-hobbyist, it is probably best to be slightly "heavy" although refrigeration and timely consumption of "light" syrup is perfectly safe.
A hydrometer, refractometer, or compensation cup can be used to more accurately measure the density of the syrup, leveraging temperature correction charts as appropriate.
Filtering, Bottling and Storage
Once your syrup has reached temperature (and density), pour it through a stack (3 or 4) coffee or cone filters in your funnel (wet and preheat filters in boiling water or steam to get better syrup flow thru filters) and into a sterilized glass Mason jar. Secure the lid and flip the jar upside down until it cools and the lid has sealed (depressed). The syrup should be bottled between 180°F - 200°F.
Syrup can be stored at room temperature safely when in a sealed container. After opening, the syrup should be refrigerated
Extra Tip:
This year we started using www.saptapapps.com to log our sap collection volumes, and to see what the syrup boiling point is based upon the weather and location.
For a very small scale hobbyist keep reading below. For someone with more advanced interests be sure to check out some of our DIY posts where we show how we built a small batch evaporator and reverse osmosis (RO) system. These were built for approximately 25-50 taps.
Hobby Sugaring
Let's cover some basics first. Here is a list of things you will need:
Drill
A drill bit (match size to spile size)
Bucket and lid (or some other enclosed container)
A spile
Squeeze bottle (with hot water in it)
Hammer
2 Stainless steel pots or steam table pans
Stove or grill
Glass Mason jars
Coffee filters
Funnel
Candy thermometer
Tapping Season
Tapping season starts in late winter when the daytime temperatures warm to above freezing, while nightime temperatures stay below freezing. Here in Murrysville, PA that generally occurs in early February.
Tapping Process
Tree diameter should be 10-inches per tap or nearly 31.5-inches around at waist height.
Select a good spot on the tree about waist high and drill a hole that is 1.5 to 2-inches deep into the tree. The hole should very slightly slope downward at the exit.
Clear the hole of any wood chips or debris by using the squeeze bottle filled with hot water.
Gently tap the spile into the tree with a hammer until the sound changes and the spile is securely seated in the tap hole. Be careful not to hammer the spile into the tree too hard, risking damage to the tree.
Hang the enclosed bucket onto the spile and wait for the sap to run!
Gathering the Sap
It is best to gather the sap daily to prevent bacteria growth which can darken the color and effect the taste of the syrup.
Filter the sap using a coffee filter before boiling to remove any small sediment, debris, or insects.
A small amount of insects on or near the tap is common on warm sunny days. These are harmless to the tree and the syrup, which will be boiled for hours before being finished.
Be sure to check out our Maple Syrup Basics video series as well.
Reverse Osmosis (RO) Process
Reverse osmosis is a process in which pure water is removed from the sap through a membrane at high pressure (~100 psi) in order to increase the sugar content of the retained sap. This significant reduces boiling time and fuel consumption. Most RO systems will cut out 50% of the water, doubling the sap sugar content and cutting boiling time and fuel costs in half.
Boiling Process
It is best to boil the sap in small batches, pouring each batch into a second pan/pot once it has boiled down significantly (less than 1 inch in pot). Also, it is far more efficient to boil the sap in a large, flatter pan than a deep pot. This increases the surface area for evaporation and speeds up the process.
Repeat the process with subsequent batches, dumping the results into the second pan/pot, so the results of each batch are combined. Once all of your sap has been processed and combined you can begin boiling that pan/pot.
Repeat this overall batch-combine-batch process until you have reached the appropriate boiling temperature (and hence density) of maple syrup in the combined pan/pot. This approach will result in much lighter colored syrup with a better flavor.
It is a common mistake to continue to add fresh sap to the pan/pot as the level decreases from the boiling process. This over cooks the sap and sugar that was in the pan/pot from the beginning. This results in a much darker and almost burnt-flavored syrup due to the prolonged heating of the sugar molecules that were in the pan/pot from the start, and the potential for niter to form and for some of the sugar molecules to burn locally.
Another common mistake is to attempt to boil too much sap at once compared to the surface area for steaming. You have probably heard the saying "don't try to boil the ocean" and the same is true for sap. It takes approximately 8.3 BTU to heat 1 gallon of water 1°F. The more sap you start with in your pan, the more BTUs will be needed to bring it to a boil and sustain it. However, the surface area and volumetric evaporation rate remain constant for a given surface area. Therefore the most fuel efficient approach will limit the number of BTUs required, hence boiling thiner layers of sap (i.e.,smaller batches).
Temperature and Density
Syrup should be 66.9 Brix at 60°F. This equates to approximately 7.5°F above the boiling point of water (which fluctuates with barometric pressure and altitude).
"Light" syrup (under 66 Brix) is prone to bacteria growth over time if unrefrigerated. Meanwhile "heavy" syrup (above 67 Brix) is prone to forming sugar crystals on the bottom of the jar.
For the home-hobbyist, it is probably best to be slightly "heavy" although refrigeration and timely consumption of "light" syrup is perfectly safe.
A hydrometer, refractometer, or compensation cup can be used to more accurately measure the density of the syrup, leveraging temperature correction charts as appropriate.
Filtering, Bottling and Storage
Once your syrup has reached temperature (and density), pour it through a stack (3 or 4) coffee or cone filters in your funnel (wet and preheat filters in boiling water or steam to get better syrup flow thru filters) and into a sterilized glass Mason jar. Secure the lid and flip the jar upside down until it cools and the lid has sealed (depressed). The syrup should be bottled between 180°F - 200°F.
Syrup can be stored at room temperature safely when in a sealed container. After opening, the syrup should be refrigerated
Extra Tip:
This year we started using www.saptapapps.com to log our sap collection volumes, and to see what the syrup boiling point is based upon the weather and location.